Survival Skills: Splitting and Seasoning Firewood
No matter whether you are interested in being a survivalist or self-sufficient there is a great deal of knowledge and experience to learn and gain from correctly splitting and seasoning firewood as well as lighting and running a fire in a wood burning stove.
In this article you will discover my personal tips and experiences including;
• How to Split Wood
• Seasoning Firewood
• How to Light and Run a Fire
Best of all I have taken a series of photos on my mobile phone to accompany each step.
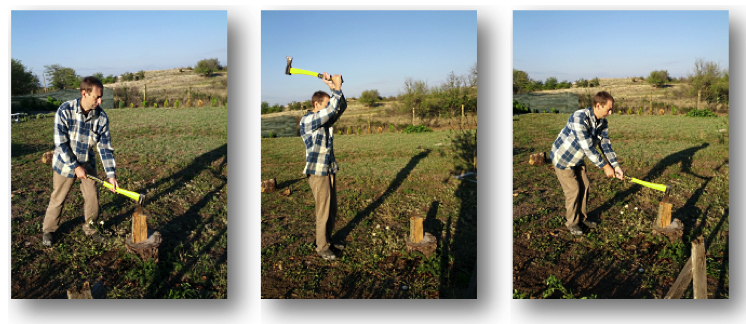
How to Split Firewood
Stay with me during this section, it is a little long but every paragraph is full of useful and interesting information that will have you itching to have a go at splitting your own firewood.
Splitting firewood is the first step in preparing for the coming winter. If you are purchasing firewood it most likely will arrive on a truck in 1 metre lengths. This is the most cost effective way to purchase wood for a fire but you could pay more and have it delivered already split, but where’s the fun in that?
The first thing you will need to do is to cut the 1 metre lengths into several pieces. For running the most efficient fire you should cut the wood into pieces just shy of the maximum width inside your stove. For most this will mean cutting each length into 3, so just over 30 centimetres or 12 inches.
Tip: If you have different types of wood in your delivery and you know one type is particularly hard to split then you may want to cut these into 4 smaller chunks to make splitting easier.
In order to split the wood you will need a wood splitting axe also known as a splitting maul. These look different to a normal axe as they have a much wider head. The idea is that the sharp side enters the wood and as this edge widens quickly like a wedge it splits the wood apart.
A splitting axe also weights more than a traditional axe with a variety of weights available. My first axe was heavy and had a wooden handle. The disadvantage to this is that the handle is prone to damage and you may eventually lose the heavy head mid swing and it also takes more effort to swing the axe.
Tip: Instead I would recommend a lighter axe with a fiberglass handle. The handle is less prone to damage and the axe is easier to swing. I can also assure you that splitting wood is about technique and not brute force. I suggest you check out Budk and view their selection of axes and hatchets and find the one that works for you. There is also a good fiberglass handle axe called the Nordic Fire Axe at Nitro-Pak.com
So let’s get down to splitting that wood. I have seen many people split their 30 centimetre chunks of wood on the ground but I find it much easier to place them on one of the largest trunk pieces I have received in the wood delivery. This gives a firmer base ensuring that all of the impact force goes into splitting the wood and also reduces the strain on your lower back.
Safety Tip
I always work with my wife during the splitting of our wood. She places the piece of wood on the trunk base and I split the wood. Make sure if you work in a pair that the assistant never stands behind you. The best place is several steps away but directly in front of you. As you strike the wood the two halves will travel to the left and right of you, so this is the danger zone!
Step 1
Choose the spot that you want to hit. You should look for a crack in the wood that is traveling out to its perimeter as this is going to be the weakest place to strike.
Step 2
To begin with rest the head of the axe on the wood at the point at which you will strike it. Keep one hand at the end of the axe handle and the other two thirds of the way down towards the head. Your feet should be in a stance where one is a few feet in front of the other.
Step 3
As you lift the axe above your head you should draw your extended hand back to meet your other hand at the end of the handle. You should also bring your foremost foot back in line with your other foot.
Step 4
You should now be in a position where your hands are together and your feet are together. At this point bring the splitting maul down and if needed you can even bend your knees and drop down a little to add more force into the strike.
Don’t expect to be splitting a piece of wood on your first attempt but it won’t take long before you are splitting wood like a pro. You may like to get someone to take your picture on their mobile phone to check your posture and technique. Your goal is to learn the minimum amount of force and effort needed to split the wood just from looking at it. When you achieve this you are a master wood splitter and will find the whole process a joy and a job to look forward to.
Tip: My final tip really isn’t a tip but remember you don’t need to split all that wood in one day. If you get tired stop as this is when an accident will happen and your splitting success rate and speed will drop wasting both time and effort.
Seasoning Firewood
The seasoning of firewood is the most important stage, yet I see this so often ignored. When your wood is delivered it still has very high water content and needs time to dry. If you do not season your firewood it will be difficult to burn, produce lots of smoke and will not burn efficiently.
The best time to get your firewood is in the spring and this will allow it to dry out through the summer, aided by the fact that you have split it into pieces. If you receive your wood earlier than this then it will be more prone to attack by insects.
If you receive your wood in the Fall then the wood will not have time to dry out. The wood may have 50% water content and if you burn this wood it will absorb masses of heat energy getting rid of the water before it will ignite. The wood will also release creosote which is the cause of chimney fires.
It is best to store you wood raised from the ground or on gravel and if you cover it with a tarp then you should ensure the tarp doesn’t reach the ground as you will simply trap all that water inside. A wood shed or outbuilding is the best option. If the wood is covered place it with the bark facing down to aid the loss of moisture content, if it isn’t then place it with the bark facing up and this will protect the wood from short showers.
How to Light and Run a Fire
There are two methods I will mention here that have different uses. The first consists of paper with kindling on top and then a wigwam design of larger pieces of wood around this. This type of fire will burn hot and quick so it is perfect for spring or autumn to take the chill off a room.
The second is an upside down fire that works well through winter and as it burns down through the wood it is very hot before it reaches the larger pieces of wood and this means they burn cleanly with little or no smoke.
I have seen upside down fires built in several ways and have had no success in getting them to burn without going out. The one method I have discovered that works every time is to place three large logs parallel to each other with a big air gap between each. Then add two more rows, rotating the direction of the wood on each level. Then add some paper and top this off with a crisscross of smaller kindling. The image at the base of this article (built outside of the stove for illustration) shows the basic concept.
A metal stove is the most common burner in homes and cabins and will have a long lifetime. These are not the best way to burn wood or to get the most heat from the wood but they are the easiest to deal with.
The main problem with a standard metal stove is that if you burn the wood quickly you will get the most heat and energy out of it but it tends to mean that a home is either red hot as the fire roars or cold as soon as it is out. You can dampen a fire in a metal stove but this will lower the temperature inside the stove and this in turn means that the gases released from the wood are not combusted sending waisted energy, pollutants and that dangerous creosote into your chimney and the air outside.
A masonry stove is one of the best options, they can be purpose built out of stone or home built by a competent DIY enthusiast, just like mine in the image below taken on my phone. The stove flue leaves the top of the stove and travels down one side, underneath and back up the other side. The surround is made from 1 ton of granite which was then tiled using a flexible adhesive and grout. I even incorporated my original metal stove to keep costs down. The general principal to this type of stove is that you can burn your wood a fast and as hot as possible and then the stone soaks up all that heat and slowly releases it over the next 12-24 hours. It’s basically a huge radiator that evenly heats a home at a constant rate.


About The Author
Michael Brown is an avid traveller and technology fan with a long term goal of becoming self-sufficient. Michael currently works as a mobile phone consultant and took the images in this article using a Samsung Galaxy Nexus mobile phone.


“Cut your own wood and you warm yourself twice.” – Henry Ford
🙂
Great quote. I love it!
Great post Michael!
Like the “how to light and run a fire”.
I appreciate all the tips and knowledge I can get
in this department. I’ve had my
difficulties in this area.
Thanks.