Critical to any first aid survival or emergency preparedness training is the ability to stitch a wound – either for yourself or for someone you are with. A quick lesson in semantics: “Stitching” a wound is synonymous with “suturing” a wound. A “suture” can mean either the entire process of closing the wound, or it can also refer to the string-like material that is used to stitch up the wound. As with many survival skills, the best advice for learning how to suture wounds is to sign up for a course and get some hands on training in stitching wounds yourself. There are courses that will teach you how to stitch a wound using different types of suture material and different types of sutures as well as proper suture techniques. This article and the video at the bottom of the page will get you started on knowing the basic steps, but there is no substitute for hands-on training.
Suture Kit / First Aid Kit
Another important bit of advice is to purchase a good suture kit. A suture kit has all of the materials you will need for wound closure, including scalpels (handles and blades), probes, forceps, hemostats (needle holder), benzoin swab, operating scissors, suture (both absorbable and non-absorbable), syringes, sterilization material, suture needles (often attached to the suture material), and medical gloves.
How To Suture a Wound: Step-By-Step
Here is a step by step guide on how to suture a wound (NOTE: Every wound is different. For most minor to intermediate wounds, this advice is sufficient. However, if the wound involves excessive blood flow or severe tissue loss, has severed tendons, ligaments, arteries, etc…some more advanced suturing techniques will almost certainly be needed. Again, you should take a class on suturing and read all you can about how to suture a wound in order to prepare you for these more intense injuries):
Sterilize
Sterilize any equipment you will be using for the procedure. A good suture kit will come with sterilization material like rubbing alcohol and/or hydrogen peroxide. Wash the equipment first with soap and water. Then soak it in either rubbing alcohol or hydrogen peroxide for 20 seconds, then let it dry on a clean paper towel or cloth. If you do not have sterilization material, you can sterilize equipment by burning on an open flame. However, if you use this method, hold the equipment to the side of the flame so that soot doesn’t accumulate on the equipment. Make sure you wear surgical gloves if you have them. If not, thoroughly wash your hands with soap and water and then rub in rubbing alcohol.
Pain Relief
If it is possible, administer pain relief to the wounded individual. If you have a local anesthetic or pain relief medicine you should use it, depending on the person’s pain tolerance and the location and severity of the wound.
Clean and Irrigate the Wound
Before you close the wound, you will need to clean out any foreign matter, wash with disinfectant material, and prepare the edges of the wound to make a complete and proper suture. Use a syringe to irrigate the wound with saline or other antibacterial fluid. If there is stubborn debris that does not come out with the irrigation method, use the scalpel to remove debris.
Prepare Edges of Wound
Prepare the edges of the wound for a clean and complete suture. If you try and stitch together jagged flesh, not only will it be difficult, there is a much larger chance the wound could get infected. This is because stitching together jagged flesh does not completely seal the wound. Once you have removed debris and properly cleaned and irrigated the wound, use the scalpel and/or surgical scissors to cautiously cut away loose or jagged flesh. Do this as conservatively as possible and only as much as is necessary to prepare the edges of the wound for a a clean suture.
Stitch wound
For most flesh wounds, you will use non-absorbable suture material. “Non-absorbable” suture just means that it is made of materials that don’t absorb into your body. There is “absorbable” suture material that is used for stitching up arteries and organs. This is helpful because in those cases, you don’t want to have to open the wounded person up again to later remove the suture material. For flesh wounds, it is easy to later remove the suture material. That is why you use non-absorbable suture material for flesh wounds.
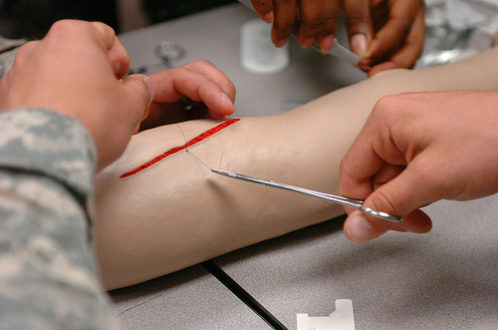
How to stitch wounds
When stitching a wound, use the hemostat to hold the suture needle. It is hard to really visualize how to suture a wound just by reading it. That is why I have included this video from Stephen Cady’s Youtube channel:


[…] finding shelter, gardening, etc…. First aid is a big one. I suggest you read my article on Stitching Wounds: How To Suture. There are probably a bunch of free first aid classes you can take from your local community […]
Matt,
I noticed in the illustration that they are using a running stitch. If a single loop of this tears out (quite possible)it loosens and weakens the entire suture. An alternative would be to make each stitch individual and tied with a surgeons knot, double overhand then single overhand on top to secure. This allows one stitch to tear out but maintain the integrity of the closure.
Thanks for sharing your knowledge. Much appreciated!
Hi there, I enjoy reading through your article. I wanted to write
a little comment to support you.
Thanks for the support!!
Hmm it looks like your blog ate my first comment (it was super long) so I guess I’ll just
sum it up what I submitted and say, I’m thoroughly enjoying your blog.
I too am an aspiring blog blogger but I’m still new to everything.
Do you have any suggestions for newbie blog writers?
I’d really appreciate it.
[…] How To Stitch A Wound In An Emergency […]
very good teaching.much better than our surgeon who showed suturing to us.
[…] http://www.howtosurvivestuff.com/survival-lifestyle/medical/stitching-wounds-how-to-suture […]
good article. Hopefully I never need to use this as I’m a bit sqeemish, but it’s good knowledge to have if you’re ever in a situation. To add to that, the company I work for makes storage bags for another company called “wilderness medical”. They have great first aid kits that are for the more advanced backpackers and outdoorsman. Great all in one kit for anyone that is spending a good bit of time away from civilization.
I am interested in this procedure.