This article explains how to start a fire in a wilderness survival situation, and how a magnesium fire starter can make the process a whole lot easier. It is important that you know how to make a fire and also that you know what equipment will help you more easily ignite and maintain the fire. Starting a fire is important for cooking food, staying warm, and for repelling insects and other wildlife. As with all survival skills written about on this website, you should practice these skills on your own so that when a survival situation presents itself, you will have the knowledge and skills to keep yourself and those who may be with you alive.
To start a fire, you need the following: 1) Ignition or “Spark,” 2) Tinder, 3) Kindling, 4) Firewood, and 5) Control.
1) Ignition – Magnesium Fire Starter
Ignition refers to the initial sparks that ignite to bring about a flame. Of course, this can be done in many ways. Matches are the obvious choice. It is a good idea to have a decent quantity of matches in a waterproof container in your survival kit. A lighter is the other obvious choice. With a lighter, you can quickly and easily ignite the tinder to start the fire. While lighters and matches will work just fine, a magnesium fire starter (often referred to as a “flint and steel”) is, in my opinion, a very convenient piece of fire starter equipment. They are simple and easy to use, renewable, and waterproof. This picture of the magnesium fire starter sold by Budk gives you an idea of what a magnesium fire starter looks like.
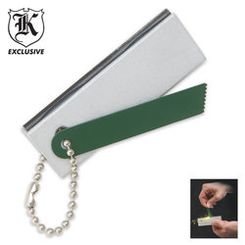
The typical magnesium fire starter consists of a block of flint with a magnesium component affixed to one of the edges of the block. The traditional way to use a magnesium fire starter is to shave off some magnesium from the magnesium edge using a knife (use the non-cutting edge of your knife, so as not to dull the blade). Once you have shaved off enough magnesium (a pile about the size of the tip of your pinky finger), then you place the flint block next to the pile of magnesium shavings and strike the flint with your knife or any other metal tool in a downward angle toward the magnesium shavings (Often, a magnesium fire starter will come with a steel striker tool so that you don’t have to use your knife). If done properly, the abrupt and rapid friction from striking the flint block will cause sparks to fly into and ignite the magnesium. Once the magnesium is ignited, that should give you plenty of time to use the flame from the magnesium to ignite your tinder. As with every skill, a visual tutorial is usually best so that you can see how it is done. Here is a video prepared by the folks at expert village:
Lighters: How to Build a Fire — powered by ehow
Hopefully, you can see the value that a magnesium fire starter provides. I prefer a magnesium fire starter over matches or a lighter, because it is waterproof, durable, and renewable (most magnesium fire starters are good for a hundred or so fires).
2) Tinder
Tinder is the material that is used to build the the fire from a spark or ignition so that it is large enough to ignite your kindling. There are many different materials that can be used for tinder. The obvious method is paper, particularly newspaper. You should have some old newspaper in your survival pack for this purpose. Wood shavings are also effective. If you need to make your own tinder, try using a knife or other sharp metal tool to scrape wood shavings off of some dead tree branches. Some alternative clever tinder materials are dryer lint and cotton balls coated in vaseline. Consider having these in your survival pack.
To use tinder in your fire building process, you should have the tinder handy and ready to use when you start the ignition or spark phase. Once you have spark, quickly, ignite the tinder. Once the tinder is ignited, it is then time to build the fire larger using kindling.
3) Kindling
Kindling is the material you use to bridge the gap between tinder and firewood. Kindling is usually made from dry twigs and small dry branches. It can be made by splitting larger pieces of wood and splintering off small narrow pieces of dead dry wood. A survival knife or a hatchet can be very useful for creating kindling.
To use the kindling, my favorite method is to build kind of a mini tee-pee or log cabin type structure over the ignited tinder. Once the kindling has ignited, begin adding larger pieces of kindling until the fire is large enough to ignite firewood.
4) Firewood
Firewood is the main fuel source for your survival fire. For firewood, you should only use dead dry wood. Wet wood (wood that comes from a living tree) will not catch fire at the low temperatures you are operating at. Gather old dead branches. You will want to find branches that are the appropriate size. If you have a hatchet, you can chop branches that you find down to a size suitable for your survival fire.
To use the firewood, start with the smaller pieces of wood first (roughly a foot in length and two to three inches thick). Place the firewood strategically onto your burning kindling. I like to use the firewood in the same way that I used the kindling, that is, to build a mini tee-pee or log cabin over the flame. Once your smaller pieces of firewood ar burning, you are pretty much set. You should be able to just keep adding firewood as needed to keep the fire going.
5) Control
With your survival fire, you will want to make sure you are being safe and efficient. Before you even start your fire, you should build a fire pit out of large rocks. This will prevent the fire from spreading beyond its intended location. It will also create a wind barrier for steps 1 through three while your flame is delicate.
In conclusion, knowing how to start a fire is a very useful and valuable survival skill. Almost just as valuable as the knowledge and understanding of how to make a fire is equipping yourself with the right fire starter equipment. You should consider investing in a magnesium fire starter or at least some waterproof matches.


And we never did.
Here, I must point the newest poverty wages for a
family of four is $22,350 therefore if a family is depending with a one-income household
making $25,000, shame on the employer because that’s only $2,650 higher than the poverty level. There happen to be many studies done which show screen time does more harm than good, no matter what all of those products like to claim.