Survival Skills: Knot Tying – The Quick and Dirty Guide
Rope is one of the most useful tools you can have in a survival situation. But a rope can only do so much by itself. Depending on your needs and the situation, you will need to know how to tie various knots in the rope or paracord. In this particular post, we are going to explore several different strategies for tying a rope off to a tree or other vertical post. In the world of knot tying, everybody has their favorite. One knot can likely serve multiple purposes, which makes it a favorite. The accompanying videos are extremely helpful to your knot-tying training.
Check out the knot used to secure the rope around the tree in the video. This is a simple slip knot with a half-hitch. This is an extremely useful knot because it allows you to quickly untie it to use the rope elsewhere. At the end of the video, you are going to see the many uses for a clove hitch. This is the knot you want to use for tying pieces of wood together, for example, for a teepee or a tripod for cooking over an open fire.
Three Basic Knots
The following three knots are pretty basic and can be learned with a little practice. It is imperative you add knot-tying skills to your survival skill set. Remember, to practice often and practice in situations that are less than ideal. Tying knots in the rain or when it is dark will help you hone your knot tying skills.
Timber Hitch

This is a fairly simple way to tie a rope and is ideal for reusing the rope. It is easily untied, yet sturdy if you pull it in the right direction. This is NOT a knot you would use in a life or death situation.
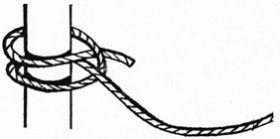
Half-Hitch

This is another simple way to tie off to a tree. It is a sturdy knot and could support a person. However, it is not the kind of knot climbers would use. That being said, it can be used in a survival situation. You can make the knot even stronger by wrapping the rope around the tree twice. This is another knot that is pretty easy to undo when you are ready to use the rope elsewhere.
Clove Hitch
This is a knot you could use for setting snares and traps. It is sturdy, but can become loose if it is pulled in the wrong direction. Check out the video to see what I am talking about.
Some More Advanced Knot Tying Skills
In this video, we are going to explore several knots, including the trucker’s hitch, or as it is referred to in the video, the canoeman’s hitch. You can already tell this is one of those knots that is simple enough to tie and serves a variety of purposes.
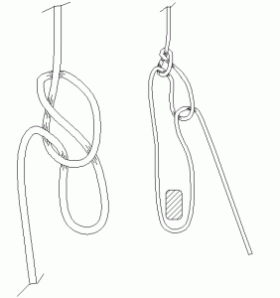
The Trucker’s Hitch (or Canoeman’s Hitch)
The canoeman’s hitch is great for cinching large or even small items down on a trailer or on the top of your vehicle. By using two half-hitches, you are given the leeway necessary to tighten the rope over your cargo. The idea of using leverage is the key to creating a tight cinch and ensuring your gear is not going anywhere.
The Prusik Knot
A prusik knot is ideal when you need an easy-to-move cinch system. This is one of those knots that is extremely valuable to know how to make and can come in handy in a variety of situations. If you need to transport gear, this is the knot to use. It is useful in climbing situations, as well as for securing a tent. The key to this particular knot is the fact it becomes stronger the more times you loop it.
As always, make your life easier in a survival situation by taking the time to practice making these knots today. With just these few knots, you have learned a valuable set of skills that will certainly be extremely useful in a survival situation as well as everyday use.
Joining Two Ropes
You have probably used two pieces of rope to create one longer one. It is pretty simple, but, and this is a big one, how easy was it to get those two pieces apart when you no longer needed the extended size? Exactly. This next section will give you a couple of different options when it comes to combining ropes as well as knots designed to come apart fairly easy.
Before you think about tying two or more ropes together it is crucial that you realize that the joining will weaken the strength of the rope. The more knots you put into the rope, the weaker you are making it. If at all possible, use very few knots. Do not use one of these tied together ropes for climbing. That requires a totally different set of rope skills that we are not addressing here.
Now, it can get a little tricky for a beginner to learn how to tie a rope by simply reading about it. Visual demonstrations are always better and for that reason, we have a video for that. In this video, you will see several different ways of tying two ropes together.
Overhand Knot
This is a simplistic knot that is fairly easy for anybody to tie. However, it is not the kind of knot that will hold up under a lot of pressure, for example, towing something heavy.
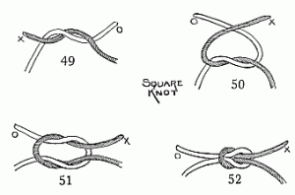
Square Knot
Again, an easy knot, but it is only viable if two identical or extremely similar ropes with the same diameter and similar materials are used. This is not the knot you want to use if you plan on separating the ropes again.
Double Overhand Knot

Watch the video for exact instructions, but this is the knot for you if you want to use the ropes individually again. It is an easy knot to untie, but is rather sturdy.
Tying ropes is definitely one of those skills that requires a great deal of practice. Once you get the hang of it, up the ante by making the same knots without looking at the ropes. Try doing it in the dark too. In an emergency situation, you may not have the luxury of light and this is an excellent way to prepare yourself for that possibility.
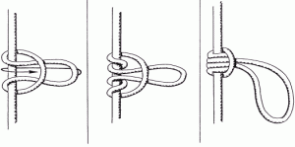
Making Loops in Your Rope
These loops can be made on the end or in the middle of a rope. A video has been created to help you see exactly what it is you need to do to make a secure loop in your rope. If you have a rope, grab it and let’s begin.
The Overhand Knot
The overhand knot is pretty basic and very common. In fact, it is so basic, many experienced folks will shun the knot. But here me out. Yes, it can be difficult to untie, which could be an issue. However, because it is hard to loosen, it is an ideal candidate for survival trapping. You certainly don’t want whatever critter you managed to snare to get free from the rope.
The Figure 8 Knot
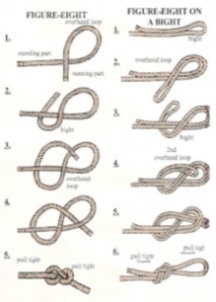
Next in the video, you will see the figure-8, which is exactly what it sounds like. This is a great knot to use on one end of a rope, leaving the rest of the rope free. The figure eight can be untied, if it has not been put under a lot of strain.
The Bowline Knot
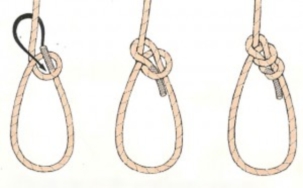
Now, prepare yourself for greatness–allow me to introduce the bowline. It is an awesome knot. It is very helpful to pull somebody up and out of a hole or hanging off the edge of a cliff or what not. Another major bonus to the bowline is it is easily undone, even if it has been under stress.
You can lay the rope on top of itself for stronger knots. This is called a bight. Check out the video to see how Mick Jagger will help you tie knots. Keep practicing those knots and as always, although some of these knots are used by climbers, they are not intended for that purpose in this video. Climbing and rappelling deserves an intense study of required knots because your life literally depends upon them.
About The Author
Craig Caudill is an outdoors enthusiast living in Kentucky. Craig is experienced in many survival and outdoors skills, such as knot tying with paracord. He freely teaches survival skills at Dan’s Depot. He is also the chief instructor at his Nature Reliance School.


First – I love the site, love the tutorials and have learned a lot from you. Sorry, but the knot tying videos are the worst I have ever seen. It’s filmed from the side, so your hands are always in the way of what’s going on. The “back around itself, loop back, back through the loop, back on itself” etc. language means nothing to anyone. It seems like the stupid easy parts get 20 minutes, and the difficult bits just blow by with no explanation.
I hate to be negative, as I enjoy your videos and appreciate all you have done. Just wanted to put that out there for you – no hard feelings?
TeeJay